


The vacuum usually doesn’t quit at a convenient time. It stops halfway through the lounge room, loses suction just as pet hair starts lifting, or makes a sharp rattling noise when the house finally has a spare half hour for cleaning. That’s when most households assume the machine is finished.
Often, it isn’t. With over 4.5 million vacuum cleaners in use across Australian homes as of 2023, basic vacuum cleaning repair and maintenance can help households avoid premature replacement and save money, according to the Australian Bureau of Statistics household data. Many common faults come down to airflow, blockages, filters, belts, or a jammed brush roll rather than a dead motor.
A methodical check matters more than guesswork. The right repair can be quick and safe. The wrong repair wastes time, damages parts, and can turn a small fault into an expensive one.
Table of Contents
- Why Your Vacuum Cleaner Suddenly Stopped Working
- Diagnosing Common Vacuum Cleaner Faults
- Your Step-By-Step DIY Troubleshooting Guide
- Repair or Replace Weighing Your Options
- Finding a Reliable Repair Professional in Australia
- Preventive Maintenance to Avoid Future Repairs
Why Your Vacuum Cleaner Suddenly Stopped Working
A vacuum cleaner usually gives some warning before it fails, but those warnings are easy to miss. Suction drops a little each week. The head starts sounding rough on carpet. The machine gets warmer than usual. Then one day it stops, or it runs without picking much up.
Most of the time, the cause is less dramatic than people expect. A packed filter, a blocked hose, a stretched belt, or hair wrapped tight around the brush roll can all make a vacuum behave as if the motor has failed. That’s why a calm inspection beats an immediate replacement decision.
Australian homes put real strain on these machines. Fine dust, pet hair, renovation debris, coastal grit, and seasonal allergens all load up filters and airways faster than many owners realise. A vacuum that looks clean on the outside can still have poor internal airflow.
Practical rule: If the machine still runs, start by assuming an airflow problem before assuming a motor problem.
There’s also a money angle. A simple home fix costs very little compared with buying a new vacuum too early. Even when the fault needs a technician, knowing the likely cause helps the homeowner describe the issue clearly and avoid paying for vague diagnostics.
A good repair approach starts with the symptom, not the brand name. Four symptoms usually tell the story:
- No power at all: Check power supply, plug fit, switch behaviour, and thermal cut-out possibility.
- Weak pickup: Focus on airflow path, filters, hose condition, and seals.
- Strange noise: Look for foreign objects, damaged bearings, or a struggling brush system.
- Brush not spinning: Check for thread wrap, belt wear, or a seized end cap.
That sequence saves time because it follows how vacuums fail in ordinary homes. It also avoids the common mistake of opening up the motor housing before checking the parts that clog and wear first.
Diagnosing Common Vacuum Cleaner Faults
Diagnosis works best when the machine is treated like an airflow system with moving parts, not just a box with suction. The most useful benchmark is airflow, measured in CFM. The Best Vacuum guide to vacuum cleaner specifications notes that airflow is the single most critical specification for cleaning ability, and a significant drop in airflow is the main diagnostic sign for many performance faults.

Power loss is not always an electrical failure
A vacuum that won’t turn on can still have a simple cause. Start outside the machine. Check the wall socket with another appliance. Inspect the plug for looseness or visible damage. On cordless units, make sure the battery is seated properly and the charger connection is clean.
If the vacuum stopped after running hot, it may have triggered thermal protection. In that case, a cool-down period may let it restart, but the shutdown happened for a reason. The usual causes are clogged filters, a blocked hose, or a brush roll that forced the motor to work too hard.
Signs that point away from a simple reset include a dead switch, repeated tripping after only brief use, or a burnt electrical smell. That’s when home repair should slow down.
Low suction usually points to airflow restriction
Weak cleaning performance is the most common complaint, and the cause is usually somewhere in the air path. The machine may still sound normal, but dirt stays behind, larger crumbs won’t lift, or the cleaner head only works on hard floors and struggles on carpet.
Check the suction path in order:
- Bin or bag full: Even partly packed debris can choke airflow.
- Pre-motor filter clogged: Fine dust builds slowly and often gets missed.
- HEPA filter loaded up: This can mimic a serious mechanical issue.
- Hose blocked or split: A clog reduces flow. A tear leaks it.
- Wand or floor head obstruction: Hair clips, paper, leaves, and toy stuffing are common culprits.
Reduced airflow after a repair often means something still isn’t seated correctly, especially filters, belts, or internal connections.
Grinding, rattling, and burning smells need fast attention
Noise changes matter. A light whistling sound can mean an air leak. A rattling sound often means a loose object in the wand, hose, or cleaner head. Grinding is more serious and can point to brush roll bearings, end caps, or motor-related wear.
A burning smell needs careful interpretation. It can come from a slipping belt, accumulated hair overheating around the brush roll, or dust packed against a hot motor housing. If the smell appears suddenly, switch off immediately and inspect before trying again.
Short test runs are safer than repeated long restarts. Running a struggling vacuum for “just one more room” is how belts melt and motors overheat.
A brush roll that won’t spin has a short list of causes
A non-spinning brush roll usually comes down to jam, belt, or drive system. Hair, thread, string, and rug fibres wrap around the roller ends first, then tighten until the roller drags. In belt-driven heads, the belt either slips, stretches, or snaps. In motorised heads, the fault may sit in the head connection, switch setting, or the brush motor itself.
Common clues help narrow it down:
| Symptom | Most likely cause |
|---|---|
| Brush roll hard to turn by hand | Hair wrap, seized bearing, debris at end caps |
| Motor runs but head is quiet | Broken or slipped belt |
| Brush spins on hard floor setting only | Incorrect mode or intermittent head connection |
| Head clicks or stalls repeatedly | Jammed roller or failing drive component |
The machine usually tells the truth if the inspection follows the symptom. Guessing doesn’t.
Your Step-By-Step DIY Troubleshooting Guide
A vacuum that quits halfway through the lounge room often looks worse than it is. In many homes, the fix is a blockage, a dirty filter, a jammed brush roll, or a tired belt. Those are all jobs a careful homeowner can handle without opening the motor housing.
The safe rule is simple. Stay with serviceable parts such as filters, hoses, floor heads, brush rolls, belts, bins, and access covers. Stop if the fault points to wiring, battery packs, charging circuits, or the motor itself.

Start with safety and simple tools
Unplug the machine first, or remove the battery on a cordless model if it is designed to come out. Empty the bin or remove the bag before you start. Work on a towel or bench so clips and screws do not roll away.
A small tool kit covers most DIY checks:
- Phillips and flat-head screwdrivers: For base plates, belt covers, and filter housings
- Torch or phone light: For looking through hoses, elbows, and internal air paths
- Long blunt rod or broom handle: For pushing clogs out without puncturing the hose
- Small scissors or a seam ripper: For cutting hair and thread off a brush roll
- Soft brush and microfibre cloth: For dust around seals, vents, and filter frames
Keep cleaning products mild. Strong chemicals can mark plastic, dry out rubber seals, and leave residue that grabs more dust later.
How to clear a clog properly
Start with the airflow path. Disconnect the hose, wand, and floor head so you can check each piece on its own. Looking through one long assembled vacuum tube rarely shows where the blockage is located.
Use this order:
- Separate the hose, wand, and head so each part can be inspected clearly.
- Hold each section up to a light and look for packed dust, paper, pet hair, or larger debris.
- Push the clog out from the opposite end with a blunt rod.
- Tap each part lightly over a bin to remove loosened material.
- Check elbows and tight bends again because that is where clogs usually hold on.
Avoid sharp tools. A small puncture in a hose is enough to cut suction and send you chasing the wrong fault.
If the blockage includes damp dust, plaster, ash, or sticky residue, wipe the opening clean and let the parts dry fully before putting the vacuum back together. A damp interior collects fresh debris fast.
If suction dropped straight after picking up one larger item, inspect the wand and floor head before anything else. Those sections block more often than the deeper motor path.
How to clean filters without damaging them
Filters are one of the biggest causes of weak performance and avoidable repairs. I regularly see machines brought in with motors running hot because the filter was left dirty for too long or reinstalled while still damp.
Follow the manual for your exact model. If the filter is washable, rinse it with cool or lukewarm water only. Let it dry completely before refitting it. If it is not washable, replace it.
A quick check helps:
- Find both filters: Many vacuums have a pre-motor filter and an exhaust or HEPA filter
- Brush off loose dust first: This keeps washable filters from turning into sludge
- Check the seal edge: Splits, warping, or crushed foam let dust bypass the filter
- Dry fully before use: Damp filters restrict airflow and can cause odours
This simple habit does more than restore suction. It reduces heat stress on the motor, which is one of the easiest ways Australian households can extend a vacuum’s working life and avoid paying for a repair that started with neglected maintenance.
How to free and reset a jammed brush roll
Turn the floor head over and remove the access plate if the model has one. Hair and thread usually build up around the roller ends first. Once that tightens, the brush slows down, the belt slips, and carpet pickup drops off.
Cut trapped hair along the cleaning groove if the roller has one. Pull debris free from both ends. Then spin the roller by hand. It should turn smoothly with light, even resistance.
Check these areas before reassembly:
- End caps: Remove lint and thread packed behind them
- Roller cavity: Clear debris between the brush and housing
- Bristles: Worn, flattened bristles reduce cleaning even if the roller still spins
- Drive path: Make sure the belt or coupling is seated properly
For greasy dust around the head, wipe the plastic housing with a damp cloth. Keep moisture away from electrical contacts on powered heads.
When a belt replacement makes sense
A belt can look fine and still be the problem. If the brush roll is clear, the motor runs, and the head no longer lifts dirt from carpet well, the belt is a sensible next check.
Use the exact belt for the model. A close match often slips, runs hot, or throws itself off the spindle. If your current machine is nearing the point where parts are getting harder to justify, it can help to compare the repair effort with a newer unit such as the Sauber Smart R1 bagless vacuum cleaner.
Basic belt replacement usually follows this sequence:
- Remove the base plate.
- Lift out the brush roll.
- Slip the old belt off the motor spindle.
- Fit the new belt to the spindle first, then loop it onto the brush roll.
- Seat the brush roll correctly before closing the cover.
- Turn the roller by hand to confirm the belt tracks properly.
Stop if the new belt slips off straight away, the spindle looks worn, or the roller will not sit squarely in its mounts. Forcing it usually damages the new belt and can crack the floor head.
A good DIY check should leave the vacuum either fixed or clearly narrowed down. That saves time, avoids guesswork, and helps you decide whether the next dollar should go into repair or replacement.
Repair or Replace Weighing Your Options
A vacuum isn’t worth repairing just because it can be repaired. The key question is whether the cost, effort, and likely service life make sense. That decision gets easier when the likely fault is already clear.
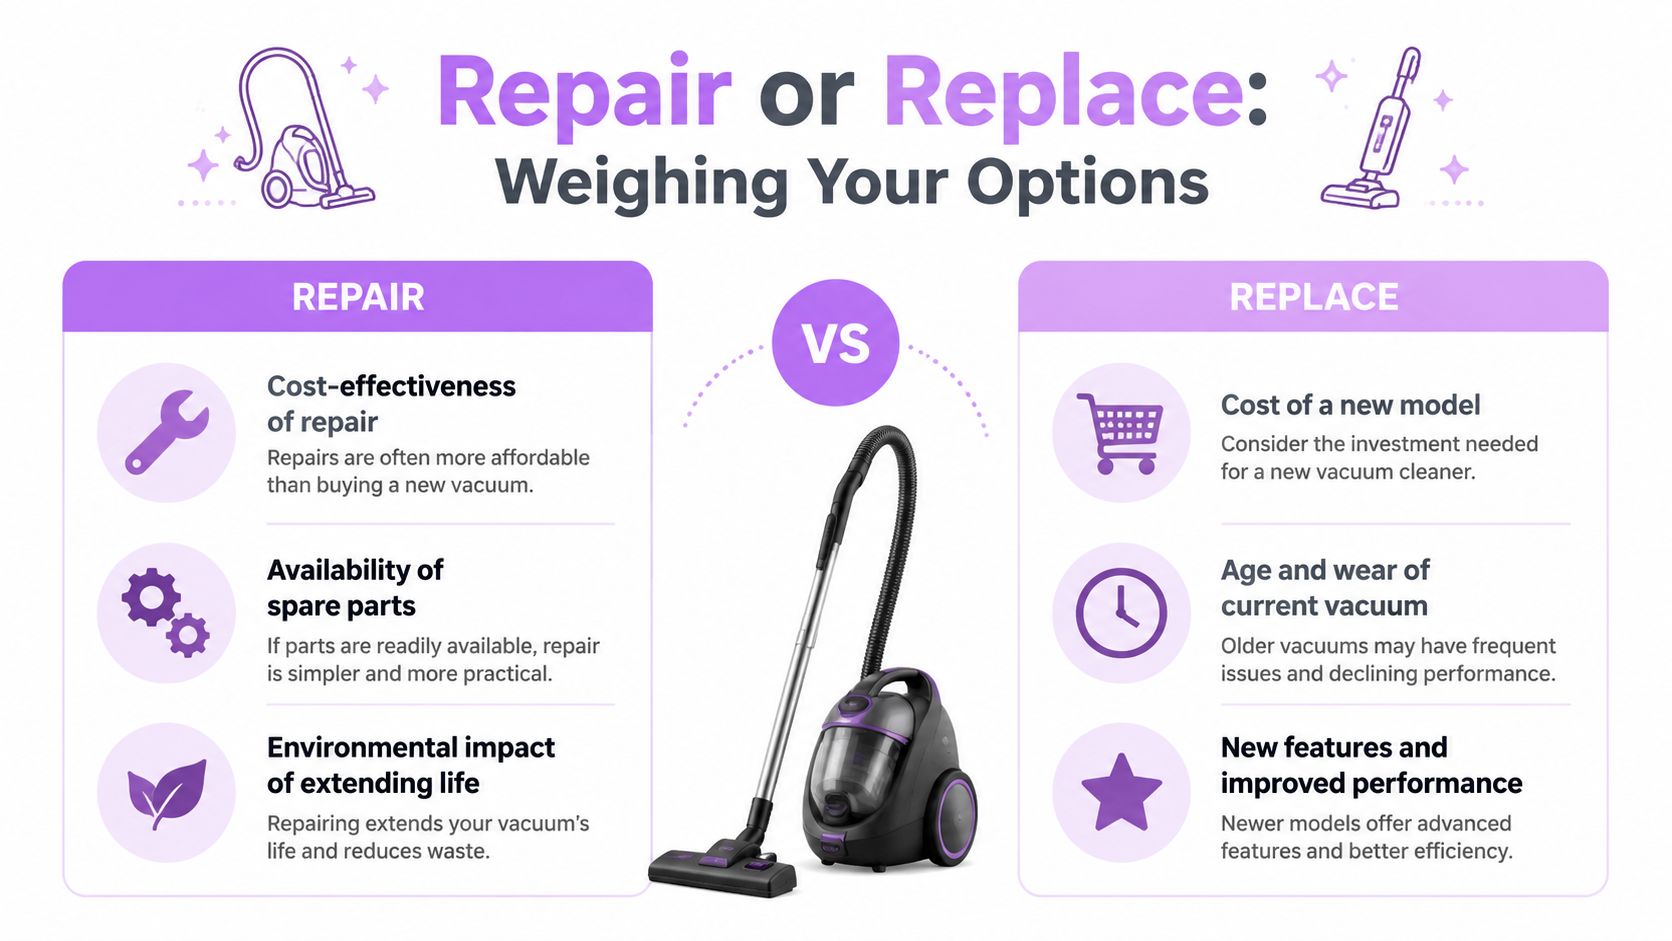
The decision usually comes down to economics and risk
In Australia, the average professional vacuum repair cost ranges from AUD $120 to $250, while many quality new vacuums sit in the AUD $300 to $500 range, based on Choice guidance on vacuum reliability and repair costs. That doesn’t mean replacement is always smarter. It means the gap is sometimes narrow enough that the type of fault matters.
A blocked hose, dirty filter system, or worn belt strongly favours repair. A major motor fault on an older budget machine usually doesn’t. Battery and charging faults on cordless models sit somewhere in the middle because parts cost and model age carry more weight.
A practical replacement benchmark is simple. If the quote approaches the value of a better new unit, replacement deserves serious consideration. For households already considering an upgrade, it helps to compare the repair bill against a current model such as the Sauber Smart R1 bagless vacuum cleaner, not just against the sunk cost of the old machine.
DIY Repair vs. Professional Service vs. Replacement
| Factor | DIY Repair | Professional Repair | Replacement |
|---|---|---|---|
| Best suited to | Filters, clogs, brush rolls, simple belts | Electrical faults, persistent suction loss, internal component issues | Repeated failures, uneconomical major faults |
| Upfront cost | Lowest if tools and parts are minor | Usually AUD $120 to $250 in Australia | Usually higher upfront than repair |
| Risk level | Low to moderate if limited to serviceable parts | Lower for the homeowner if the technician is competent | Low after purchase, but highest cash outlay |
| Time required | Fast for simple faults, longer if diagnosis is wrong | Depends on booking, parts, and workshop turnaround | Fast once purchased |
| Likelihood of success | Good for obvious blockages and maintenance faults | Better for hidden electrical or mechanical issues | Certain, but only if the new model suits the job |
| Environmental impact | Extends life of existing machine | Extends life if parts are available | Highest material turnover |
Worth remembering: A cheap repair that fails twice is more expensive than one correct repair, and both can cost more than replacing the machine once.
When replacement is the smarter call
Replacement usually wins under three conditions:
- The vacuum has multiple faults: For example, weak suction, brush failure, and battery decline at the same time.
- Critical parts are hard to source: Some older or discontinued models become uneconomical because serviceable parts aren’t practical to obtain.
- The machine no longer suits the home: A small stick vacuum may be the wrong tool for a large carpeted house with pets.
What doesn’t work is replacing a vacuum every time suction drops. That often solves a maintenance problem with a credit card instead of a screwdriver.
Finding a Reliable Repair Professional in Australia
Choosing a technician matters as much as choosing whether to repair at all. A poor repairer can miss a basic airflow fault, fit the wrong belt, overlook a cracked hose, or return a vacuum with unresolved safety issues. A good one asks clear questions, tests properly, and explains what failed in plain language.
What to ask before booking
Homeowners don’t need trade training to vet a repairer. A short list of practical questions usually reveals whether the business works methodically.
Ask about these points:
- Brand familiarity: Have they worked on that make and model before?
- Fault process: Do they test airflow, filters, hoses, and head assembly before discussing motor replacement?
- Quote clarity: Is the estimate for diagnosis only, or diagnosis plus likely repair?
- Parts policy: Do they use model-correct parts and explain alternatives if originals aren’t available?
- Workmanship support: What happens if the same fault returns soon after service?
The answer style matters too. Straight answers are a good sign. Vague promises usually aren’t.
For homeowners comparing providers, operational systems matter in the background as well. Tools that organise lead handling, quoting, and service follow-up can reduce confusion and missed communication. That’s why resources like How Recepta.ai helps appliance companies are worth a look for anyone interested in how stronger customer workflows support better repair service.
Why safety standards matter
Vacuum repairs aren’t just about getting the machine running again. They also involve electrical safety, correct reassembly, secure wiring paths, and proper fitment of protective covers. In Australia, AS/NZS 60335.2.64 standardised safety and performance protocols for vacuum repairs, and Standards Australia is the relevant reference point for that framework.
That’s one reason many households prefer a vetted service network over an unknown local listing. A properly managed platform should make it easier to book reliable help, especially when the job sits beyond basic home troubleshooting. For households wanting a professionally organised option, Star Cleaner Australia services provide access to vetted, insured, safety-checked operators with a 100% satisfaction guarantee. That kind of structure is especially useful for busy families, NDIS participants, and property managers who need consistent follow-through rather than guesswork.
A reliable repair professional should make the diagnosis feel clearer, not more confusing.
Preventive Maintenance to Avoid Future Repairs
A vacuum rarely fails out of nowhere. In most homes, the warning signs show up weeks earlier: the motor sounds sharper, pickup drops off, the floor head starts pushing crumbs instead of lifting them, or the machine runs hotter than usual. Catch those changes early and you can often avoid the repair bench altogether.

For Australian households, preventative care matters because fine dust, pet hair, beach sand, and renovation residue put extra load on filters, seals, and motors. A simple maintenance routine can extend the life of many domestic vacuums by years. In practical terms, that often means 30 to 40 percent more service life before major parts wear out.
A simple maintenance routine that works
The goal is steady airflow and less strain on moving parts. Keep the routine simple enough that it gets done.
- Empty the bin or change the bag before it is overfilled: Packed dust reduces airflow long before the container looks full.
- Check filters on a set schedule: Washable filters need to be fully dry before refitting. Damp filters can cause odour, dust clumping, and motor stress.
- Inspect the hose and wand for partial blockages: Small clogs often cause poor pickup and an overworked motor, even when the vacuum still turns on.
- Cut away hair and thread from the brush roll: This prevents seized bearings and keeps the head spinning at the right speed.
- Clean the floor head wheels and underside: Grit buildup increases drag and makes the machine harder to push.
Exterior cleaning helps too, especially around latches, wheels, and the neck of the floor head where sticky residue collects. Mild, non-harsh cleaning products are usually enough. The aim is to remove grime without leaving residue on plastic or rubber parts.
Storage and cleaning habits that extend service life
Storage is where a lot of avoidable damage starts. Cords wound too tightly can break internally near the entry point. Hoses stored with a hard bend can split over time. Machines left in hot sheds, damp garages, or direct sun tend to suffer brittle plastics, swollen filters, and corrosion on contacts.
Usage habits matter just as much.
- Match the floor head to the surface: A hard-floor tool on tile or timber reduces drag and saves wear on the cleaner head.
- Keep wet mess out of a dry vacuum: Moisture and household dust turn into sludge inside hoses and filters.
- Clean out renovation dust quickly: Plaster dust, ash, and fine debris load filters fast and can shorten motor life if left sitting in the machine.
- Listen for changes in sound: A higher-pitched motor note often points to an airflow restriction before a full blockage appears.
Homeowners who want a steady care routine can use the vacuum and home cleaning advice in Star Cleaner’s knowledge hub as a reference point.
A well-maintained vacuum is cheaper to own, easier to use, and less likely to fail at the worst time. If basic maintenance does not restore normal suction, smell, or motor behaviour, that is usually the point to stop guessing and book qualified repair help.